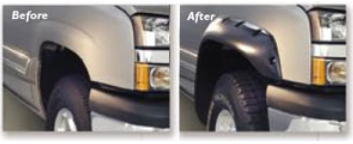
 Bushwacker is a leading manufacturer of Fender Flares and truck accessories with excellent design standards, innovation and warranty against warping, cracking or other factory defects. Bushwacker Fender Flares protect the vehicle from debris or mud that gets flung further outward as the wheel turns. They come in a factory black color that matches the trim on most four-wheel vehicles. However, they can be painted to match a specific vehicles’ color. Bushwacker Fender Flares have five designs including the Bushwacker Cut-Out Fender Flares, Pocket Style Fender Flares, OE Style Fender Flares, Street Flares and Extend-A-Fender flares. This article covers the entire installation process and all the necessary guidelines needed before and after installing the above named Bushwacker Fender Flares, minus Bushwacker Cut-Out Fender Flares.
Pre-Installation Steps
Step 1: Referencing the manual, take a quick inventory of all the parts in the box; this should include the right front and rear Fender Flares as well as the left front and rear (for a full set), U-Clips, Screws, Edge Trim and an Edge Trim tool. Depending on the type of Fender Flare and model of vehicle the parts will vary.
Additionally, have the tools required for installation all gathered and ready to go; this includes an adjustable socket and ratchet, a Utility Knife, Wrench, #2 Philips Driver bit, Electric Drill, drill bit and T45 Torx bit. Depending on the type of Fender Flare and model of vehicle the parts will vary.
Step 2: Confirm that you have the correct type and fit of Fender Flares before starting the installation. Aside from reading the label on the box as well as the manual, hold the flare to the vehicle surface to verify a correct fitting. The inner edge should be in contact with the wheel rim, and the outer flare edge should conform to vehicle fender contours. Small fit adjustments can be made by simply trimming excess plastic, sanding and scraping to ensure proper fit. Note that you cannot stretch a fender flare to fit a vehicle it’s not designed for. Bushwacker Flares are made to the exact specifications of a particular vehicle.
Note: Using larger tires may increase the area required to turn the vehicle for installation. Some Tire combinations may need lowering bump stops and/ or installing steering stops to prevent tire shoulders from contacting the installed flares. Additional modifications may also be essential to maintain a minimum of 4 inch clearance between flares and exhaust pipes. Note that Exhaust gases should not vent directly onto flares.
Installation Steps
Step 1: Support vehicle and remove the factory flares, fender trim or mud flaps if they were installed. In case the flares need some bit of edge trimming during installation, peel two to three inches of red vinyl backing away from the edge trim tape. Continue to peel as you push the edge trim onto the fender flare. Cut the edge trim evenly with the end of the fender flare using a utility knife.
Step 2: Front Flare Installation
- Hold the Bushwacker Fender Flare in place against the body of your vehicle and press on it firmly. Mark hole locations on the fender. Drill marks with a 3/16 inch bit (the measurement of the bit will depend on the style of Bushwacker Fender Flare being installed). Insert a supplied Torx screw through each pocket in flare. Ensure that the front edge is lined up with the bumper and the bottom edge lined up with the bottom of the fender.
- Place a 3/8” thick rubber spacer on each screw from the backside of the pocket. All spacers must be installed prior to installation on fender. Install a double-sided foam tape on the backside of the fender flare. When ready to install flares, peel off the second side of the tape and place the fender on the body aligning the holes on the fender flare with the holes in the body.
- Start to bolt each screw with a T45 Torx bit in each mounting hole, but do not tighten until all screws have been started. Repeat the same process on the second front fender flare.
Note: You may also choose to secure splash shield, drill a hole and use a zip tie to attach it to the bumper, but is optional.
Step 3: Rear Fender Installation
- Holding the Rear Flare on the fender, align it with the door seam and fender contours and press down firmly. Using the existing part holes as a guide, mark hole locations on the fender in 5 evenly spaced places. Then, drill each mark with a 3/16 inch bit and insert provided screws through each pocket in flare.
- Place a 3/8” thick rubber spacer on each screw from the backside of the pocket. Threads must protrude through spacers for proper attachment of flare. All spacers must be installed prior to installation on the fender.
- Start each screw with a T45 Torx bit in each pocket but do not fully tighten until screws have been started. It is important to not over-tighten screws, as this may cause them to strip. Use a Torque setting of 90 inches.
- Hold the Rear Door Piece on the door, aligning with the Rear Main Flare. Press firmly to ensure proper whole location alignment.
- Using the holes in the part as a guide, mark hole locations on fender (4 places). Open Door. Drill marks with a 3/16 inch bit. Insert a Torx screw through each pocket in flare.
- Place a 3/8” thick rubber spacer on each screw from the backside of the pocket. Threads must protrude through spacers for proper attachment of flare. All spacers must be installed prior to installation on fender.
- Repeat step 3d, and then move to step 3h.
- Use flat end supplied Edge Trim Tool, seat bottom edge of edge trim first by inserting straight flat end between bottom edge of edge trim and part at one end and slide over entire top edge to the other end.
Using the above pointers, your Bushwacker Fender Flares should fit perfectly on your vehicle. If you run into issues not covered in this guide, contact the customer service number provided in the manual that came with your Fender Flare. For more useful information and regular updates about Fender Flares, visit our article page regularly.
Back to Fender Flares page
Posted on February 8th, 2013