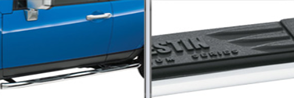
 Nerf bars are one of the most popular accessories for trucks and SUV’s for a reason; they provide protection for the sides of your vehicle, streamlined looks, a “step-up” into a raised cabin, and best of all, they are pretty easy to install. If you are not as experienced in aftermarket accessory installation as other truck enthusiasts, that’s okay – we’re going to take you through the process step-by-step to achieve an expert-like installation of a Westin Nerf Bar on a standard cab truck or SUV.
First things first, make sure you have the proper tools and work space to perform this installation; preparation is always the key to successful aftermarket modifications. With that said, there are a few items you need to gather before we start:
Tools Required
| Power Drill with a Phillips bit and Socket |
Towel/blanket to sit or lay on |
Torque wrench |
| Ratchet Set |
Mini-level |
Small pieces of scrap wood and shims |
With everything gathered in your workspace, we can start with the installation of your Westin Nerf Bar.
Installation
Step 1: Using the manual that came with your Nerf Bars, take an inventory of ALL the parts in the box, right down to the nuts, bolts and washers. We wouldn’t want to get you three steps in and have to stop because we are missing something as simple as a hex bolt. When finished accounting for everything, move on to step 2. If any parts are missing, call the customer service number listed in the manual; most manufacturers will ship you the replacement part(s) for free.
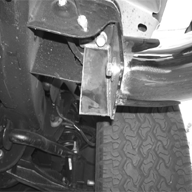 Step 2: Under the truck, there are two body mount bolts that will be the holding place for the Nerf Bar remove these and set them on the blanket where they can be easily accessed. You will need them again in a few steps.
Step 3:
Next, take out the driver and passenger side mounting brackets. They are not always labeled, so you may have to hold them up to the body mount holes to determine which one is which. Staring with either side, attach each bracket to the appropriate side by partly threading the factory body mount bolt.
Step 4:
Take one of the sidebars out of the box and position it on the appropriate side bracket; using the two provided 1/2" x 2" hex head bolts, 1/2" lock washers and 1/2" flat washers, attach the sidebar to the bracket, but do not fully tighten it.
Step 5: Before tightening, it is important to make sure that your Nerf Bar is level. To do this, sit in front of the Nerf bar with your mini level and wratchet. Position enough wood underneath of the Nerf Bar so that it is pushing up just slightly on the bottom. Now hold up the mini level and add in shims until the bubble is in the middle. You can then proceed in fully tightening the body mount bolts as well as the 1/2" hardware. Repeat this step for the other side, and...
Congrats! You have now completed the installation process for a Westin Nerf Bar. If you you ran into issue along the way or have got to this point and things don't quite look right, then keep reading. You may be experiencing one of the following or more issues:
Problem #1: The Nerf Bars are tightened but feel unstable:
Most likely, the bolt sizes are incorrect. This can be solved by taking an incorrect size bolt to a local machine shop and have them make you a new one/ If there isn't a machine shop close to you, then contact the vehicle manufacturer and they can send one to you.
Problem #2: The Nerf Bars do not stick out far enough to step on safely:
There could be a number of issues causing this to happen. The first thing to check would be if you have the right size brackets, or possibly the brackets may be on wrong. With either situation, you will need to take off the Nerf Bar and reexamine the brackets. If they are the right size and were mounted properly, call customer service
Problem #3: The Nerf Bars "flare out" from the vehicle, nearly touching the tires:
Ok, this one is easy. You either bought the wrong Nerf Bars (i.e. for extended cab when you have a regular cab), or you were shipped the wrong product. Either way, the only solution is to call cusotmer serviec and make arrangements to ship them back for the proper fitting Nerf Bars.
For more information regarding Nerf Bars check back on our articles page or blog regularly.
Have additional question or concerns not addressed in this article? Email us and we will respond to your inquiry in a timely manner.
Posted on February 7th, 2013