
Purchasing a Roll-up Tonneau cover is one of the best decisions a truck owner can make. With that said – Congratulations! No doubt, you have taken oodles of free time asking friends as well as reading articles, product reviews and manufacturer specifications in deciding which Tonneau cover would be the most aerodynamic, provide the most protection for your valuables and dress your vehicle look as though it were being showcased in an auto show. Now you have reached the phase almost every aspiring auto lives for – installing it! If you're not quite an expert yet, but want to install your new Tonneau cover like one then read on. We are going to break down the process step-by-step; from the tools you need to making the final adjustments so your tailgate closes properly and fits securely with your new Roll-up Tonneau cover.
This article covers general installation guidelines for the following type of Tonneau cover:
Roll-up Tonneau covers are sleek, sporty and affordable – the perfect choice for those on-the-go that need to protect their cargo from the elements while keeping a low-profile as well as flexibility in the use of their truck bed – literally. The vinyl used in roll-up Tonneau covers is weather resistant, and most manufacturers offer warranties that will replace or repair it for the life of your truck. From the "one-hand release operation" of the Truxedo Deuce to the economical and "no access" theft protection of the Tonno Pro Lo Roll, Roll-up Tonneau covers are one of the best values in security and style you can get for your truck.
No matter which Roll-up Tonneau cover you purchased, you are sure to find this guide useful. Just follow the listed steps and in 30 minutes or less, you should be ready to hit the road with your new Roll-up Tonneau cover.
Pre-Installation Steps
Step 1: Before starting the actual installation process, open the manual that came with the Tonneau cover and take a quick inventory of all the parts in the box; this should include the cover, 6 to 8 clamps, 2 rails, and 3 to 4 bows, as well as 2 elevator bolts, 2 arm stay locks, 2 drain tubes and shims if needed. Of course, parts will vary according to bed size and type of Tonneau cover. If any parts are missing, refer to the customer service number also listed in the manual. Most manufacturers will ship the parts you need directly to you at no cost. If the parts list matches what is in the box, you are ready to move to step 2.
Step 2: Remove any debris and wash the inside as well as the sides of the truck bed with a mild soap and cold water. Everything should be clean and dry before installing the Tonneau cover.
Step 3: Take the box with all the parts out to the vehicle and place it on the open tailgate; this will help keep everything together and give you a convenient place to put extra parts as well as tools if you do not have a table or bench close by.
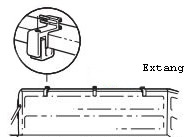
Step 4: Some manufacturers such as Extang require only an allen wrench to install, which is included in the box. Most Tonneau covers however, install with basic hand tools that almost everyone has around the house - a tape measure and an adjustable wrench. Gather these and place them in the box where they can be seen. For some Tonneau covers, additional tools such as a socket wrench, scissors, a drill and sheet metal drill bit may be needed. Be sure to check the Tonneau cover manual for the exact tools necessary to properly install the cover
Installation Steps
Roll-up Tonneau cover
 Always read the instruction manual before starting the installation to check for any additional tools, parts or modifications that may be required to properly install the retractable Tonneau cover. In addition, some Tonneau covers include electrical components that may require a second person to help run the wire or parts too heavy to lift unaccompanied.
Step 1: Take the Tonneau cover rails out of the box and remove any tape or packaging. With the tailgate closed, place each rail on its corresponding side inside the truck bed. In case the rails are not labeled, the tensioner of each Tonneau rail should face inward at the rear. Position each rail on the truck bed 1" back from the cab rail.
Step 2: If the Tonneau cover does not include a front rail, skip to step 3. If it does include a front rail, place it in the 1" space  between the cab and side rails, and slide the corners into the front rail until they "snap" into a locked position. Align the assembled Tonneau cover frame evenly between the cab and the tailgate and check to confirm the rails are level with the bed rails. If they appear uneven, use the shims that are often included in the provided installation kit. Once level, extend your tape measure to ensure the ends of each rail are properly spaced from each other. This measurement should be located either in the manual or on a sticker on one of the rails.
Step 3: If the rail clamps are pre-installed, match the indentations on the rail with each clamp from front to back. If the clamps are separate, first use a spring clamp to keep the end of each rail flush with the outside of the truck bed. Open the hardware bag and place the first clamp about 8 inches from the front of the bed and tighten it with the proper size or an adjustable wrench.
 Step 4: Moving from the bulkhead to the tailgate, finish clamping each Tonneau rail to the bed rails, evenly distancing each clamp until reaching the last clamp - which should be installed about 10 inches forward from the rear. Make sure that each rail is still flush with the outside of the truck bed, the rails are level with the tailgate, and the ends are still the proper distance from one another. When all of these are in check, re-tighten all clamps to confirm they are secure and remove the spring clamps. Some Tonneau covers include a back rail, and if yours is one of them, insert it in the same way as the front rail, sliding the corners into each groove until they click, and clamp it on.
Step 5: Insert the bows in the alotted slots. If the bows are spring loaded, push in the spring let the other end fall in to the slot.
Step 6: Depending on the manufacturer, the cover will either secure by snap or stick via Velcro. Follow the manual closely for directions on how to place the cover over the frame, as well as opening and closing it.
You have now completed a general installation for Roll-up Tonneau covers. For more information about troubleshooting, maintenance or missing parts, contact the manufacturer or dealer from where the Tonneau cover was purchased.
For more updates and information on Tonneau covers, as well as helpful hints and full guides to maintenance and installation of a variety of truck, SUV and ATV accessories, check back on our articles page regularly, as well as our Facebook page.
Back to Tonneau Covers page