
Purchasing a Retractable Tonneau cover is one of the best decisions a truck owner can make. With that said – Congratulations! Before you break out into celebration however, you still have to tackle the installation process. If you're not quite an expert yet, but want to install your new Tonneau cover like one, then read on. We are going to break down the process step-by-step; from the tools you need to making the final adjustments so your tailgate closes properly and fits securely with your new Retractable Tonneau cover.
This article covers general installation guidelines for the following type of Tonneau cover:
- Retractable Tonneau covers
Retractable Tonneau covers provide the perfect blend of the convenient access, aesthetics and weather-tight security. Made from either vinyl, aluminum or fiberglass, they are sturdy like a bank vault when shut and open quickly with the press of a button or flip of a switch to reveal the truck bed when you need it without having to remove the cover. Some models such as the Pace Edwards Bedlocker Electric open by remote control, bringing an already advantageous idea to a new level of genius through hands free operation.
Pre-Installation Steps
Step 1: Before starting the actual installation process, open the manual that came with the Tonneau cover and take a quick inventory of all the parts in the box; this should include the cover, the canister, top cover, 6 to 8 clamps, hardware pack, 2 rails, 2 drain tubes as well as shims and a front sill if needed.
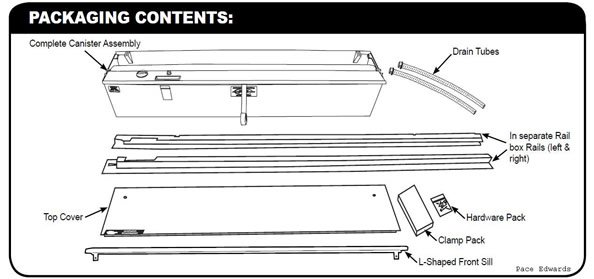
Of course, parts will vary according to bed size and type of Tonneau cover. If any parts are missing, refer to the customer service number also listed in the manual. Most manufacturers will ship the parts you need directly to you at no cost. If the parts list matches what is in the box, you are ready to move to step 2.
Step 2: Remove any debris and wash the inside as well as the sides of the truck bed with a mild soap and cold water. Everything should be clean and dry before installing the Tonneau cover.
Step 3: Take the box with all the parts out to the vehicle and place it on the open tailgate; this will help keep everything together and give you a convenient place to put extra parts as well as tools if you do not have a table or bench close by.
Step 4: Some manufacturers such as Extang require only an allen wrench to install, which is included in the box. Most Tonneau covers however, install with basic hand tools that almost everyone has around the house - a tape measure and an adjustable wrench. Gather these and place them in the box where they can be seen. For some Tonneau covers, additional tools such as a socket wrench, scissors, a drill and sheet metal drill bit may be needed. Be sure to check the Tonneau cover manual for the exact tools necessary to properly install the cover
Installation Steps
Roll-up Tonneau cover
 Always read the instruction manual before starting the installation to check for any additional tools, parts or modifications that may be required to properly install the retractable Tonneau cover. In addition, some Tonneau covers include electrical components that may require a second person to help run the wire or parts too heavy to lift unaccompanied.
Step 1: Depending on the Tonneau cover, you may have to install an L-shaped front sill on the rear window guard or hanger brackets in the front corners of the truck bed. If your cover does not include these parts, then skip to step 2. If it includes an L-shaped front sill, simply remove the bolts from the rear window guard tie-downs, remove the liner from the L-shaped sill, line the holes and re-install the bolts. If you have support brackets, line them up with the OE holes in the front corner of each side of the bed and install them.
Step 2: Remove the canister and the top cover from the box. There may be additional materials attached to the canister to prevent shipping damage such as plywood. Remove this with an adjustable wrench or socket.
Step 3: If your installation required the aforementioned mounting brackets, hang the canister on them and install it with the provided screws. If your Tonneau cover does not include brackets, you will have to position the canister manually about 2 to 3 inches above the bed rails (as seen right). An easy way to do this is to use the box the Tonneau cover was shipped in. Place the box approximately 1 foot from the cab and set the canister on top.
Step 3: Carefully open the rail box lengthwise to avoid scratching the rails. Remove both rails as well as any packaging or protective coverings and place them on the truck bed.
Step 4: For some Tonneau covers without brackets, the canister should contain guides showing where to install the rails. Slide each rail into this area until the grips that hold them in place are engaged and install the hardware required to secure them into the pre-drilled holes. Before installing clamps, be sure to have the canister centered between the truck bed rails. Then, install the tailgate end of the pull strap to the underside of the driver's side rail using the machine screw located at the tailgate end on the underside of the rail. After doing this, use your wrench to secure one clamp in the 6 to 12 inches from the tailgate and one six to twelve inches from the canister. Pay close attention to make sure the rail is flush with the truck bed. If they are not flush, you will need to install shims to make them level.
If you are installing the rails with brackets; position them over the rails against the side of the truck, leaving about a 1/8 inch gap to the tailgate. Using a wrench, secure one clamp in the middle, one close to the tailgate and one close to the canister. Space the rest of the clamps between these on each side.
For both types, re-measure the distance between rails after clamping them to make sure the cover will work properly. To be sure, slowly pull out the cover almost into the closed position, which is about 6 inches from the tailgate. If there is any resistance, stop immediately, close the cover and balance the rail by taking or adding shims where needed.
Step 5: For some Tonneau covers, such as the Pace Edwards Full Metal Jack Rabbit, there are included sweep seals attached to the rails that require lubrication. In this case, gently pull them out with a small allen wrench and lightly apply a silicone spray or lubricating oil such as WD-40. This rule also applies to the tracks of other Retractable Tonneau covers.
Step 6: Before actually attaching the top cover, the drain tubes that prevent any water leaking must be installed into the canister. To do this, open the cover and push the tube fittings in the holes under the canister until they click in place. Then, take each tube and place it where water can safely exit the truck bed (e.g. pre-drilled holes in the floor or front wall).
Step 7: For the final step, attach the top cover to the canister and secure it with the provided screws. Then, fully retract the cover into the open position and back into the closed position – this time, all the way until the cover 'locks'.
You have now completed a general installation for Retractable Tonneau covers. For more information about troubleshooting, maintenance or missing parts, contact the manufacturer or dealer from where the Tonneau cover was purchased.
For more updates and information on Tonneau covers, as well as helpful hints and full guides to maintenance and installation of a variety of truck, SUV and ATV accessories, check back on 4 Wheel Online regularly, as well as our Facebook page and blog.
Back to Tonneau Covers page
Posted on January 12th, 2013